Getting started with the iOS SDK
Overview
The iOS SDK is available on GitHub.
Key Features
- Remote Player management
- iOS 18 support
- Verified Google IMA integration
- OMSDK support
- Sample Player applications & code samples
- Fullscreen playback management
- Access to Player events and state facilitated
- Chromecast support
Supported versions & requirements
| Swift 5+ |
| iOS 14+ |
| Xcode 14+ |
Sample applications
To help you learn about our iOS SDK and to facilitate testing, discover our sample SDK applications:
- iOS sample app: Download the sample app here directly on your device and explore the functionalities of the SDK in a user-friendly UI
- Source code: Access the source code of the sample app here, customize as you wish and easily integrate the SDK into your projects
Getting started
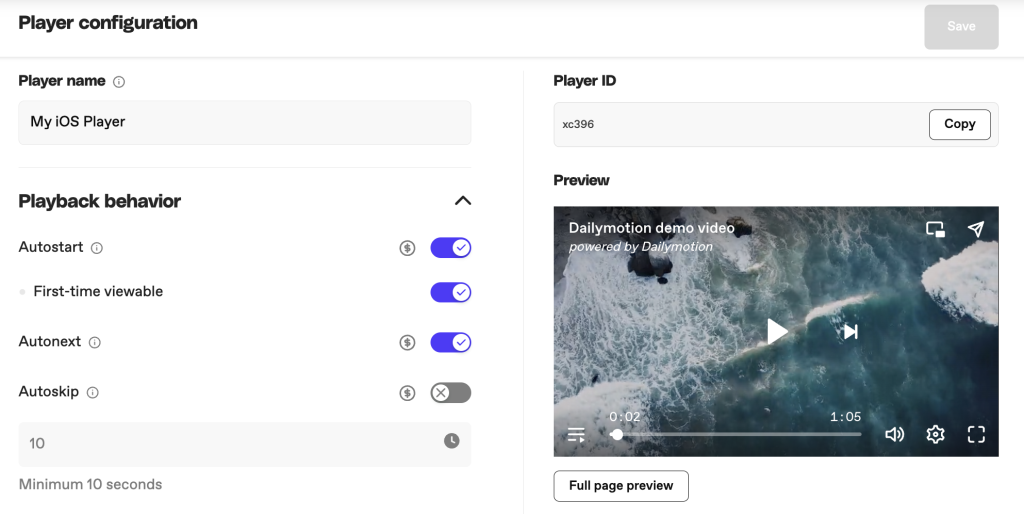
1. Create an iOS Player configuration
As a first step you need to create a custom Player configuration for your iOS application in your Dailymotion account. A unique Player Id will be generated which will be required for Player initialization in-app, accurate monetization, targeting and attribution.
The custom Player configuration can be created and managed either through the “Players” tab in the Dailymotion Studio or programmatically via the Platform API.
2. Add the SDK to your Project
Using the Swift Package Manager
The Swift Package Manager is a tool for automating the distribution of Swift code and is integrated into Xcode and the Swift compiler.
- Click
File - Click
Add Packages... - Specify the git URL for Dailymotion iOS SDK: https://github.com/dailymotion/player-sdk-ios
Implement it manually
- Clone the Dailymotion iOS SDK git : https://github.com/dailymotion/player-sdk-ios
- Copy the
Frameworksfolder from the cloned git into your project - From Xcode select your project
- Select
GeneralTab - Expand
Frameworks, Libraries,andEmbeddedContent section - Open previous copied
Frameworksfolder
Select Drag and Drop into Frameworks, Libraries, and Embedded section the .xcframework found in the directories DailymotionPlayer and AdvertisingFramework found there.
The frameworks added to the project target should be :
DailymotionPlayerSDK.xcframeworkDailymotionAdvertisingServices.xcframeworkGoogleInteractiveMediaAds.xcframeworkOMSDK_Dailymotion.xcframework
Now you can build your project 🚀
3. Create & Add a Player view
Import Dailymotion SDK
			import DailymotionPlayerSDK
import AVFoundation
import UIKit

class ViewController: UIViewController {
// Container View IBOutlet - host view for the player
  @IBOutlet weak var playerContainerView: UIView!
...
Create the Player view and add it to view hierarchy – Closure
			// Please replace the player id with your own Player ID accessed via the Dailymotion Studio or Platform API.
    Dailymotion.createPlayer(playerId: <#"xbzlf"#>, videoId: <#"x84sh87"#>, playerParameters:  DMPlayerParameters() , playerDelegate: self) { [weak self] playerView, error in
// Wait for Player initialisation and check if self is still allocated
      guard let self = self else {
        return
      }
      // Check For errors
      if let error = error {
        print("Error creating player: \(error)")
      } else {
        guard let playerView = playerView else {
          return
        }
        // Attach the created Player View to your player container View
        let constraints = [
          playerView.topAnchor.constraint(equalTo: self.playerContainerView.topAnchor, constant: 0),
          playerView.bottomAnchor.constraint(equalTo: self.playerContainerView.bottomAnchor, constant: 0),
          playerView.leadingAnchor.constraint(equalTo: self.playerContainerView.leadingAnchor, constant: 0),
          playerView.trailingAnchor.constraint(equalTo: self.playerContainerView.trailingAnchor, constant: 0)
        ]
        // Activate created constraints
        NSLayoutConstraint.activate(constraints)
      }
    }
Create the Player view and add it to view hierarchy – Async/Await
			do {
      // Please replace the Player ID with your own Player ID accessed via the Dailymotion Studio or Platform API.
      let playerView = try await Dailymotion.createPlayer(playerId: <#"xbzlf"#>, videoId: <#"x84sh87"#>, playerParameters:  DMPlayerParameters() , playerDelegate: self)
      // Attach the created Player View to your player container View
      let constraints = [
        playerView.topAnchor.constraint(equalTo: self.playerContainerView.topAnchor, constant: 0),
        playerView.bottomAnchor.constraint(equalTo: self.playerContainerView.bottomAnchor, constant: 0),
        playerView.leadingAnchor.constraint(equalTo: self.playerContainerView.leadingAnchor, constant: 0),
        playerView.trailingAnchor.constraint(equalTo: self.playerContainerView.trailingAnchor, constant: 0)
      ]
      // Activate created constraints
      NSLayoutConstraint.activate(constraints)
    }
    catch {
      // Handle erros
      print("Error creating player: \(error)")
    }
}
Implement DMPlayerDelegate :
In order to get full functionality and benefit from full monetization, implementing DMPlayerDelegate is mandatory.
			extension ViewController: DMPlayerDelegate {
func player(_ player: DMPlayerView, openUrl url: URL) {
    UIApplication.shared.open(url)
  }

  func playerWillPresentFullscreenViewController(_ player: DMPlayerView) -> UIViewController {
    return self
  }

  func playerWillPresentAdInParentViewController(_ player: DMPlayerView) -> UIViewController {
    return self
  }
}
Initialization method
| Name | Info | Example |
| Create Player | To create the player object DMPlayerView, the object will be returned in the completion closure given as a parameter. Player ID is mandatory and can be created and managed on Dailymotion Studio | Dailymotion.createPlayer(playerId: "PLAYERID", videoId: "VIDEOID", playerParameters: DMPlayerParameters() , playerDelegate: self) |
Required configuration methods
After configuring the initialization of the player, it is required to implement the necessary methods of the protocol DMPlayerDelegate to ensure your application can manage the player in all contexts.
| Info | Example |
| Informs the delegate that the app has to open a URL in a browser result as a user action | |
| Asks the delegate for a UIViewController to present the player in fullscreen | playerWillPresentFullscreenViewController(_:) |
| Asks the delegate for a UIViewController to display an Ad dependent by a UIViewController | playerWillPresentAdInParentViewController(_:) |
Explore the iOS SDK Reference
Now that you’ve learned more about how to embed content in your iOS environments, you can dive deeper and see what’s possible to do to improve your integration and customize it to fit your needs with the following elements:
- Advanced runtime parameters: On top of your Player configuration, you can add extra parameters that can change at runtime.
- Methods: Our methods allow you to control the Player behavior, customize the user experience and create dynamic interactions.
- Events: Work with events to capture user interactions with the Player and trigger custom actions.
- State: Retrieve the data of your Player state
Add runtime Player parameters
While the main Player experience is controlled using the settings defined in your Player configuration from the Dailymotion Studio (Players tab) or the Platform API, additional runtime customization is achievable using client-side parameters. They allow you to specify additional Player behavior or pass in required values to a specific Player embed.
In the example below, we’re adding the following runtime parameters to the existing Player config defined in the {Player ID} placeholder:
startTime=15: video will start playing from second 15mute=true: video will start muted
Add runtime parameters in the dmPlayerParameters variable:
var dmPlayerParameters = DMPlayerParameters()
dmPlayerParameters.customConfig = ["keyvalues":"category=sport§ion=video", "dynamiciu":"USERID/12345"]
dmPlayerParameters.allowIDFA = true
dmPlayerParameters.allowPIP = true
dmPlayerParameters.defaultFullscreenOrientation = .landscapeRight
dmPlayerParameters.mute = true
dmPlayerParameters.scaleMode = .fit
dmPlayerParameters.startTime = 15
dmPlayerParameters.loop = false
Dailymotion.createPlayer(playerId: "PlayerId", playerParameters: dmPlayerParameters, logLevels: [.all]) { playerView, error in
}
Manage event listeners
To listen to events triggered by the Player, you need to implement the 3 delegate protocols: DMPlayerDelegate , DMVideoDelegate and DMAdDelegate .
Pass the delegate protocols in the createPlayer method:
			Dailymotion.createPlayer(playerId: "PLAYER_ID",playerDelegate: self, videoDelegate: self, adDelegate: self , completion: { [weak self] (dmPlayer, error) in
      // Create Player Done
})
Pass the delegate protocols to the created DMPlayerView instance:
			Dailymotion.createPlayer(playerId: "PLAYER_ID", completion: { [weak self] (dmPlayer, error) in
      // Create Player Done
      dmPlayer?.playerDelegate = self
      dmPlayer?.videoDelegate = self
      dmPlayer?.adDelegate = self
})
Retrieve Player state
The Player state can be retrieved at any time using the getState(completion:) method:
			self.dmPlayerView?.getState(completion: { [weak self] (playerState) in
     print("playerIsPlaying : \(playerState?.playerIsPlaying)")
     print("videoId : \(playerState?.videoId)")
     print("playerError : \(playerState?.playerError)")
})
Fin all available states in the iOS SDK Reference.
Implement fullscreen
The iOS SDK supports a built-in fullscreen feature as well as custom fullscreen implementations.
Out-of-the-box implementation
In order for the fullscreen functionality to work, you have to implement DMPlayerDelegate and playerWillPresentFullscreenViewController function where you have to return a view controller that can be presented on:
			class ViewController: UIViewController {
 override func viewDidLoad() {
  super.viewDidLoad()
  Dailymotion.createPlayer(playerId: "PlayerID", playerDelegate: self) { playerView, error in

   }
 }
}
extension ViewController: DMPlayerDelegate {
 func playerWillPresentFullscreenViewController(_ player: DMPlayerView) ->
 UIViewController {
    return self
  }
}
Checking fullscreen state :
- You can check at any time after Player creation if the Player is in fullscreen by calling
playerView.isFullscreenthat will returntrueif is in fullscreen mode orfalseif not. - Implementing from
DMPlayerDelegatetheplayerDidPresentationModeChangefunction, you will get aDMPlayerView.PresentationModeenum that will contain all possible player presentation states :inline,pictureInPictureandfullscreen:
			extension ViewController: DMPlayerDelegate {
func playerDidPresentationModeChange(_ player: DMPlayerView, presentationMode: DMPlayerView.PresentationMode) {
switch presentationMode {
    case .fullscreen: break
    case .inline: break
    case .pictureInPicture: break
    default: break
    }
}
}
Handling fullscreen orientation :
- Using
defaultFullscreenOrientationparameter fromDMPlayerParametersobject passed to create Player in order to set the default orientation when user requests fullscreen. - Using the function
setFullscreen(fullscreen: Bool, orientation: DMPlayerFullscreenOrientation? = nil)to overwrite the default orientation when programmatically want to switch to fullscreen.
Custom implementation
If you don’t want to use the out-of-the-box fullscreen feature, you can implement your own fullscreen experience starting from version 1.1.0. following the below steps:
- Implement
DMPlayerDelegateandplayerWillPresentFullscreenViewControllerfunction where you have to returnnilinstead of aUIViewController - Implement
playerDidRequestFullscreenandplayerDidExitFullScreendelegates to handle the Fullscreen/Exit Fullscreen - Call
notifyFullscreenChanged()after each orientation change
			class ViewController: UIViewController {
 override func viewDidLoad() {
  super.viewDidLoad()
  Dailymotion.createPlayer(playerId: "PlayerID", playerDelegate: self) { playerView, error in

   }
 }
}

extension ViewController: DMPlayerDelegate {
 func playerWillPresentFullscreenViewController(_ player: DMPlayerView) -> UIViewController? {
    return nil
 }

 func playerDidRequestFullscreen(_ player: DMPlayerView) {
    // Move the player in fullscreen State
    // Call notifyFullscreenChanged() the player will update his state
    player.notifyFullscreenChanged()
 }

 func playerDidExitFullScreen(_ player: DMPlayerView) {
    // Move the player in initial State
    // Call notifyFullscreenChanged() the player will update his state
    player.notifyFullscreenChanged()
 }
}
Implement Chromecast
Main Google Cast SDK documentation can be found here.
1. Add NSBonjourServices to your Info.plist
Specify NSBonjourServices in your Info.plist file to allow local network discovery to succeed on iOS 14.
Add both _googlecast._tcp and _B88B034A._googlecast._tcp as services to allow proper device discovery as follow:
			<key>NSBonjourServices</key>
<array>
  <string>_googlecast._tcp</string>
  <string>_B88B034A._googlecast._tcp</string>
</array>
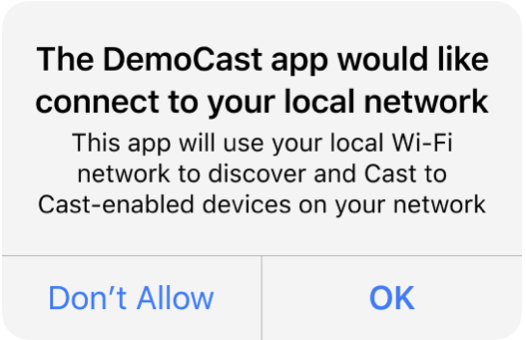
2. Add NSLocalNetworkUsageDescription to your Info.plist
We strongly recommend customizing the message shown in the “Local Network” prompt to explain why your app needs access to the users’ local network.
Add in your Info.plist file an app-specific permission string for NSLocalNetworkUsageDescription explaining that your app needs access to the users’ local network to discover cast-enabled devices and other discovery services, like DIAL. Customize the message as you need.
			<key>NSLocalNetworkUsageDescription</key>
<string>${PRODUCT_NAME} uses the local network to discover Cast-enabled devices on your WiFi
network.</string>
This prompt appears as part of the iOS Local Network Access dialog the first time users try to cast from your app.
3. Add Cast Button
In order for the cast feature to be operational, you need to add a Cast Button in the UI. You can use the default one provided by the Google Cast SDK.
			let castButton = GCKUICastButton(frame: CGRect(x: 0, y: 0, width: 24, height: 24))
castButton.tintColor = UIColor.gray
navigationItem.rightBarButtonItem = UIBarButtonItem(customView: castButton)
Find more info about the Cast Button in Google Cast documentation.
4. Mini Controller and Expanded Controller (Optional)
Enrich the user experience using the UI controller options provided by default in the Google Cast SDK:
5. UI customization (Optional)
You can customize the Google Cast SDK provided UI as shown below:
			// Get the shared instance of GCKUIStyle
let castStyle = GCKUIStyle.sharedInstance()

// Set the property of the desired cast Views
// Navigation bar buttons style
castStyle.castViews.deviceControl.connectionController.navigation.buttonTextColor = .black

// Tool bar style
castStyle.castViews.deviceControl.connectionController.toolbar.backgroundColor = .white
castStyle.castViews.deviceControl.connectionController.toolbar.buttonTextColor = .black

// Connection controller style
castStyle.castViews.deviceControl.connectionController.backgroundColor = .white
castStyle.castViews.deviceControl.connectionController.iconTintColor = .black
castStyle.castViews.deviceControl.connectionController.headingTextColor = .black
castStyle.castViews.deviceControl.connectionController.bodyTextColor = .black

// Device chooser style
castStyle.castViews.deviceControl.deviceChooser.backgroundColor = .white
castStyle.castViews.deviceControl.deviceChooser.iconTintColor = .black
castStyle.castViews.deviceControl.deviceChooser.headingTextColor = .black
castStyle.castViews.deviceControl.deviceChooser.captionTextColor = .black

// Refresh all currently visible views with the assigned styles
castStyle.apply()
Find more information and examples on how to style the default UI in Google Cast documentation.
Best practices
Handling advertising set up
In order to benefit from accurate monetization, make sure to implement the following steps:
- Create a dedicated Player config for your iOS app from your Dailymotion Studio or via the Platform API, and use the generated Player ID in the Player initialization method.
- Publishers in GDPR countries are required to implement a TCF2-registered CMP in their native app to ensure monetization. Collect consent from CMP before loading the Player.
- Implementing
DMPlayerDelegateis mandatory, see here. - Implement the necessary methods to ensure your application can manage the Player in all contexts, see here.
- Pass in and update custom advertising values. To learn more please see here.
Player Logs
Dailymotion iOS SDK uses os_log to log informations.
Logging levels:
- off
- debug
- info
- error
- all
The default values of the logging level is [.info, .error]
In order to customise the level of details logs should return, use the createPlayer method and pass in the logLevels parameter the desired value. The SDK will then handle logs as expected.
			Dailymotion.createPlayer(playerId: "PlayerId", logLevels: [.all]) { playerView, error in

}
Preloading & Reusing the Player
Preload Player
In your application, you can preload the Player before the user attempts to play a video. To preload the Player, create a Player as shown here and store the returned DMPlayerView object.
When ready to show the Player, attach the DMPlayerView to the desired view hierarchy and call the loadContent() or play() method depending if you already passed a video ID or a playlist ID when creating the Player.
Reuse Player
When using the Player in your app, you can (and should) reuse the same Player instance. Therefore, a single-player instance can load multiple videos by using the loadContent() method.
Destroy/Release the Player
The Player instance will be automatically destroyed and removed when the DMPlayerView object loses reference and the Automatic Reference Counting (ARC) counter is Zero.
Errors
CreatePlayer errors and didFail delegate errors from DMPlayerDelegate can throw the following list of errors :
| ERROR | ERROR DESCRIPTION |
|---|---|
PlayerError.underlyingRemoteError(error: Error) | Triggered by the embed Player and forwarded by the SDK. Details about possible video access error is documented here. |
PlayerError.advertisingModuleMissing | Triggered by the SDK when the advertising module is missing. Please add it, otherwise the Player will not run |
PlayerError.playerIdNotFound | Triggered by the SDK when the Player ID cannot be found |
PlayerError.stateNotAvailable | Triggered by the SDK when asking the Player for current state, but state is not available at that time |
PlayerError.internetNotConnected | Player request failed since the internet seems offline – Retry the call |
PlayerError.requestTimedOut | Player request took longer than expected – Retry the call |
PlayerError.otherPlayerRequestError | Other Player request related error – Check the logs for more info |
PlayerError.unexpected | Triggered when something went wrong and an unexpected error has occurred – Check the logs for more info – If it persists, contact support |
PlayerError implements swift Error protocol and can be safely casted to NSError if needed.
Example of handling errors:
			func handlePlayerError(error: Error) {
    switch(error) {
    case PlayerError.advertisingModuleMissing :
      break;
    case PlayerError.stateNotAvailable :
      break;
    case PlayerError.underlyingRemoteError(error: let error):
      let error = error as NSError
      if let errDescription = error.userInfo[NSLocalizedDescriptionKey],
         let errCode = error.userInfo[NSLocalizedFailureReasonErrorKey],
         let recovery = error.userInfo[NSLocalizedRecoverySuggestionErrorKey] {
        print("Player Error : Description: \(errDescription), Code: \(errCode), Recovery : \(recovery) ")

      } else {
        print("Player Error : \(error)")
      }
      break
    case PlayerError.requestTimedOut:
      print(error.localizedDescription)
      break
    case PlayerError.unexpected:
      print(error.localizedDescription)
      break
    case PlayerError.internetNotConnected:
      print(error.localizedDescription)
      break
    case PlayerError.playerIdNotFound:
      print(error.localizedDescription)
      break
    case PlayerError.otherPlayerRequestError:
      print(error.localizedDescription)
      break
    default:
      print(error.localizedDescription)
      break
    }
  }